Multimeters are widely used in the home and in business, particularly in automotive organisations.
They are frequently used for a variety of tasks when analysing your car for problems.
A volt/ohm metre is another name for a multimeter. This electronic device is used to take measurements. It combines a variety of functions into a single, simple-to-use handheld piece of equipment.
Multimeters measure:
- Amps
- Volts
- Resistance
A circular dial is standard on almost all models. This gives you the option of choosing the type of measurement you require. The most common options are current, voltage, and resistance. Some of the more advanced variants will go so far as to measure continuity and can even be used to test diodes.
Although there are many different types of multimeters, we can divide them into two categories: manual multimeters and auto ragging multimeters.
The distinction is similar to that between manual and automatic cars: the manual requires more user input.
The manual version allows you to select the input range. The auto-ranging type has some options on its dial. This machine will guess on your behalf based on the information received through the probes on the equipment.
There are four simple ways to use your multimeter with a car:
We’ll look at some of the most fundamental ways you can use your multimeter to troubleshoot vehicle issues.
Remember to go with a digital model that comes with a vast array of attachments. They will come in handy when working on your car.
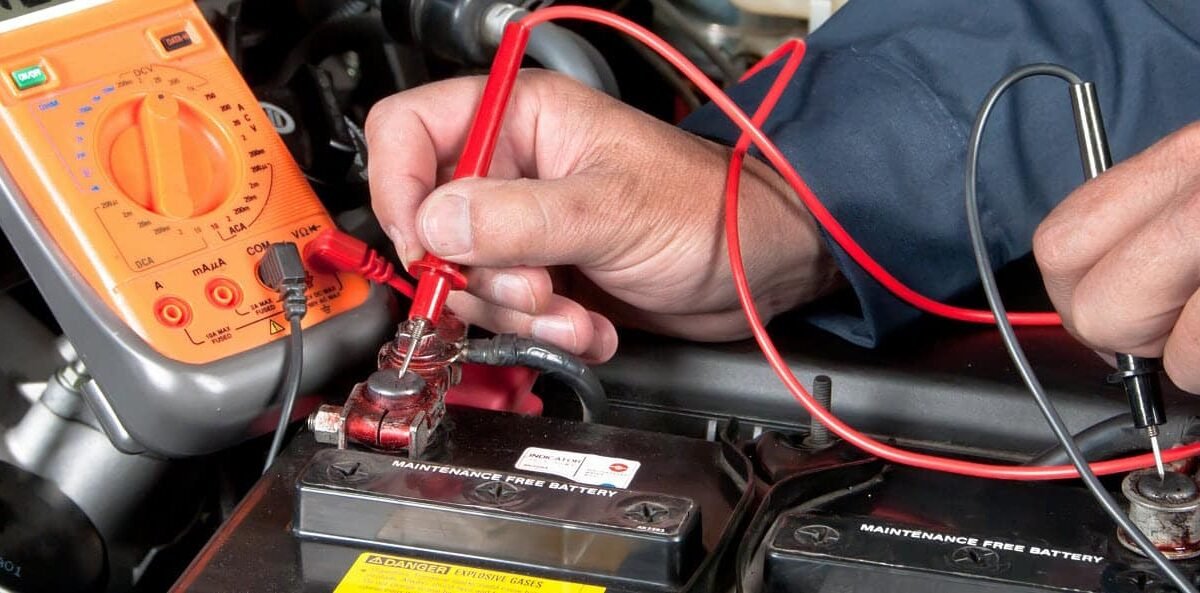
1) Testing a car battery
Sometimes you can guess that your battery is starting to run low on power. With a multimeter, you can easily check this suspicion.
Make sure you wear safety glasses and also a sturdy pair of gloves. Car batteries have chemicals that can be extremely dangerous if you are not adequately protected.
Flip open the hood and locate your battery. Refer to the manual and disconnect the cables from the battery.
Use a setting of 20V DC for an accurate reading.
Hook up the multimeter’s red probe with the battery’s positive terminal. Connect the black probe to the negative terminal.
Wait a few seconds and read the meter: it’s as simple as that!
If you have a 12V battery then you’ll need a minimum of 9.6V in order for it to receive a charge. This may not even be enough and you may need a new battery.
Note: A 12V battery that is fully charged and is not connected to the car should show test results of between 12.4V and 12.7V.
2) Testing a car alternator
If all is well with the battery then testing the alternator is a smart move.
Wear gloves and glasses again and keep yourself well clear of moving parts.
Set the multimeter to 20V DC.
Ensure that the battery is connected but the engine switched off.
As when testing the battery, connect red to positive and black to negative.
With the car off the reading should be 12.5 – 12.8V if there’s no issue with the battery. Startup the engine. You should now see the multimeter reading between 13.8V and 14.8V if the alternator is functioning perfectly.
As a final test, if you flick the heater blower too high and turn on the headlights, you’ll notice a slight drop in voltage before the reading returns to the above range. (This is assuming that the alternator is working OK.)
3) Testing the wires on your speakers
Imagine this situation…
You have the dash open, the stereo removed and also the door panels. The speakers are just about to be replaced but you realize that you are not sure which is positive and which is negative.
Get out your multimeter!
Put your stereo on with the volume low.
Set the multimeter to 20V DC. Place the negative probe onto one of the chassis grounds. Get the speaker and put the positive probe on one of the terminals.
The one with voltage is positive. Job done!
4) Checking the ohms on your subwoofer
Many people today have car entertainment systems featuring powerful subwoofers.
As these subs are bridged and ready to go, you must be careful. When you want to connect the wires from the sub to the amp, it’s crucial that they are correctly wired.
Hook up both ends of the multimeter to the amp’s speaker terminals.
Set the multimeter to 200 ohms (Ω) and you can check that the ohm level of the sub tallies with the rating of the amplifier.


Stay connected